Showing posts with label Home DIY's. Show all posts

Monday, June 4, 2012

Reuse, Renew and UPCYCLE...Upcycled Wooden Pallets

Wooden Pallets being upcycled into furniture and the like are becoming increasingly popular, and I must say that some of the ideas and designs really are quite amazing for these scrap pieces of wood. This morning I have been stuck to my computer and in awe of the possibilities that these old pallets have! The idea of Upcycling is so appealing in that it is good for the environment AND your pocket. So I thought I would share with you a few of my favourites that I have come across. From tables and headboards to shelves and seating, there are so many possibilities for the use of these wooden pallets. 


All photos via Pinterest

Saturday, April 21, 2012

Spring/Summer Flower Wreath DIY

I saw something similar to this somewhere on the internet while browsing around one day a while ago but finally decided to try my hand at creating my own Flower Wreath. I came across some surprisingly cute flowers at the Dollar Store the other day so this DIY turned out to be completely budget friendly as well! (which is a huge bonus) I was kind of unsure as to how it was going to turn out but once I got started I loved it!

What you will need:

Flowers (fake)
Wreath (I chose to use a wreath made out of wrapped twigs purchased from Micheals craft store. I chose this wreath because if it shows around the sides it looks great!)
Hot glue gun
Glue Sticks
Scissors
Some creativity

The size of wreath you choose to use depends on the size you want your wreath to be, keep in mind it will become a little larger once the flowers have been added.


Glueing the flowers in place will ensure that your wreath stays intact while hanging on your door, you don't want to come out after a windy day and have half your work blown away.


I chose to use two different types of flowers in three colours green, yellow and white. The flowers come attached so use scissors or wire cutters as I had to use because these particular flowers had wire in the stem. Keep a stem on each flower so that you can finagle and embed it into the wreath to also keep it in place.


Once you have all of your flowers cut start glueing them to your wreath.


I scattered the different colours and flowers in a random pattern on the wreath which looks much better than a uniform pattern.


Keep sticking and glueing as you make your way around your wreath base.


........and there you have it! Your finished custom floral wreath.


Here is myn finished and hanging on my front door. I love the bright colours which will be perfect for summer!


Enjoy! Happy DIYing!

Monday, April 16, 2012

Hermès Paper Clutch Bag DIY


Whilst browsing around my usual sites this morning I came across a great new post from the blogger Love Maegan. She did a great little piece about these adorable printable clutch patterns that are currently featured on the Hermès website under the Travel the World with Hermès section of the site. (which is great by the way, its almost like Hermès own little pin board for the world to see) While paper is probably not the most practical for a usable clutch it is perfect for a great little art piece to showcase. Maybe using a plastic coated paper would be a little more durable for the occasional use in the practical sense. I also thought because the clutch is such a great, simple and versatile style, you could cut out the template and trace it onto a great enforced fabric and make a totally usable clutch! I am going to do both, the paper for my office as a little art piece and also test out the fabric and see how successful that is!

They have 6 designs that you can print....


The printable patterns they have available for this clutch are all so great. When clicking through the site there is an easy to follow printable cut-out page for each design. 

Enjoy!

Source: Hermes.com, lovemaegan.com

Friday, April 6, 2012

Happy Easter!

All of the colours that seem to coordinate with Easter are so perfect this year with the pasty pastels that are gracing the store fronts and the coloured eggs being decorated for the Holidays. I for one am a huge fan of pastels, I love how subtly bright and cheerful they are wether they're gracing your legs in a great pair of jeans or the shell of a little easter egg. I came across some amazing ideas for Egg Decorating the other day and thought what could be a better DIY than this for the weekend? Not all are pastel in colour but are equally amazing and could be great in any colour of your choosing. Wether your dunking, dipping, painting or wrapping these cute little eggs are great for an easy, fun and festive DIY. How did you decorate your eggs this year?


Source: homefurnitureatilogue.com, tipjunkie.com, moyeamedia.com, outletsofcolorado.wordpress.com, huffingtonpost.com

Sunday, August 28, 2011

Rosette Lampshade DIY

I was in a love hate relationship with the lamps in my bedroom. They are cute and simple and do the job they are meant to but I was beginning to find them boring. The lamps are meant to just be temporary until we find a pair that we absolutely love, which is surprisingly harder than I thought. I never just want to settle when it comes to the decor in our house. I want to find that one piece that stands out and says "Perfect".

Bedside lamps were one thing we really could not go without so we decided to buy an inexpensive pair of temporary lamps at Ikea. They are totally cute and match the colour scheme in our room perfectly. But they just needed a little 'je ne sais qua' and I couldn't figure out what I could do to them until I found the permanent replacements. That was until I had some extra strips of grey fabric.


And voila! Nothing too drastic but just enough to add a little more interest to the shades. These rosettes are so simple to make, but I think they are adorable. So with a little fabric, hot glue and some creativity (mind you very little) these lamps have been spruced up just enough to make me love them again. Now I am debating buying more of the same fabric and covering the entire shade in rosettes. But for now the little flowers add just enough.


Enjoy!

Tuesday, August 23, 2011

Solution to my jewelry organization!

Keeping my jewelry neatly organized used to be such a headache for me. I have and adorable jewelry box but it always seemed too small to hold all my oversized rings, bracelets and bangles, dangly earrings and large pendant necklaces. My necklaces were always getting tangled together no matter how neat and tidy I kept each compartment. Finally I had enough and decided that it was time to find a solution.

The solution to my tangled mess of jewelry came in the form of an adorable little shelf with hangers. Not only does it keep my necklaces and larger pairs of earrings neat and tidy but it displays them like a little piece of art in our bathroom.


I was not sure what to put on the top shelf but looking on the counter in the bathroom I saw the nail polish bottles for the summer season shoved in a corner. With the changing seasons I am always changing my nail polish choices to suit the time of year. So now I have the perfect little spot for the select colours I am wearing during any season. I love being able to have a place for everything, it makes finding things so much easier, that rooting under the sink in the basket I keep all my colours in. Or detangling a mess of chains in my jewelry box.


I am loving this bathroom more and more each time I add something new.  I was very hesitant about painting the room purple as I am more of a neutral tone kinda girl. But when the hubby gave me the go ahead to make this bathroom my own (seeing as I already took it over with all my stuff) I thought why not? I love it its my little girly oasis. The rest of the house (besides my office) is suited towards the both of us. So I love having my own little space to get ready each day.


Enjoy!

Monday, August 1, 2011

....Office Re-decorated!

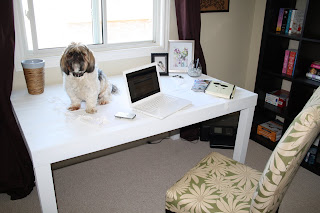
I have been wanting for a long time to redecorate my home office and this past weekend I dedicated my time to doing so. I found a fabulous little dining room table that I ended up painting white, which makes for a great desk and its very large so a fab crafting table ta-boot! (I never liked the 'office' desks). I stopped off at Rona the other day to grab some spray paint and they had a huge clearance tent. I of course had to see what deals they had. And there it was way in the back all on its own this fab table that just needed some love. I am so in love and even more so because I got it for a steal!!

So I bought a few other accessories, gave some of them a little makeover and I finally have an office space I love.

Enjoy!


My lion that I sprayed white : ) Love it


This is my little assistant, he likes being up where he can see whats going on and also to look out the window. Love him!!!


This cork board was plain brown when I got it so I had to customize! Love

There are a few other items I would like to get for this room but all in good time. It takes me a while to shop because I like to find that 'perfect piece'. : )
” data-num-posts=”10″ data-width=”550″>

LinkWithin

Related Posts Plugin for WordPress, Blogger...